Introduction:
Connection:
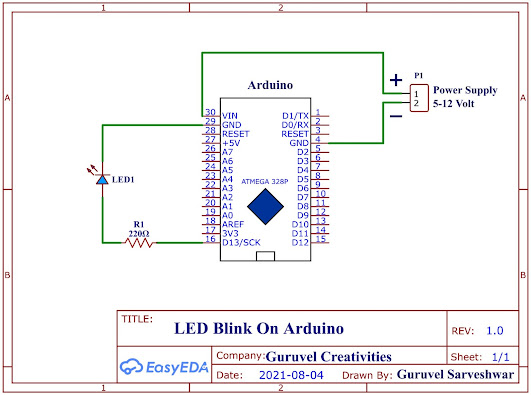
To begin, take the Arduino Board and place it on a DOT Board or Bread Board. Use wires for the connections, and fit a 5mm LED on the Bread Board. Connect the LED's positive (+ve) end to Arduino's D13 Pin and the LED's ground to the Arduino Board's Ground. Connect the power supply's positive (+ve) to the Arduino's Vin Pin and the power supply's negative (-ve) to the Arduino's Ground. With these connections, the circuit is complete. Next, upload the project program to the Arduino Board. Let's see "How to Upload the Code to the Arduino Board."
Code
Upload:
After completing the circuit connection, install the Arduino Software on your mobile or desktop. You can find the software link in the I2C Module Connection Article. Open the software and connect the Arduino Board using an Arduino cable. In the "Tools Menu," select your board name and the board's USB port. Click on the Example Program and choose the Blink Program. Then click the ⏩ symbol to upload the program to the Arduino Board.
Working:
1) Arduino
Board =1 (Arduino NANO or UNO)
2) 5mm
LED =1
3) 220Ω
¼ watt Resistor =1
4) Arduino
Board Cable =1
5) Bread
Board or DOT Board =1
6) Some
Wires =1
By,
G.
Guruvel Sarveshwar,
EEE
Dept.


0 comments:
Post a Comment
Thanks For Visiting